Tag: oracle

  • Patching Oracle Database on Docker

    I wrote this post which details creating an Oracle 19c Database docker image.

    Following on from this post I will detail the steps required to patch and Oracle 19c Docker image. With most of my technology-related posts, they are written because I will require this information in the future so a blog post provides reference for my future self.

    Running an Oracle 19c database in docker you are not able to patch the database in a traditional sense, you cannot hop into the container and patch it with opatch you need to create a “patched” image, thankfully Oracle on their GitHub (here) provide some shell scripts to make this task easier.

    Note – You will need to have a My Oracle Support login and valid support agreement to download Oracle Database patches if you don’t have one of these your not going to get very far. Further, if you have chosen to use a “slim” Oracle database docker image you will likely run into problems, during the “sliming” down process folders are removed from the docker image that means when it comes to patching opatch will throw an error since some folders and directories don’t exist.

    Clone the Oracle Docker images to your local machine with git (if you don’t already have them)

    git clone https://github.com/oracle/docker-images.git

    In this example, we will be patching a single instance 19c database. Head down into the SingleInstance folder then samples and applypatch.

    cd ~/docker-images/OracleDatabase/SingleInstance/19.3.0/samples/applypatch

    The scripts used in this example rely on the following directory structure:

    19.3.0.0
       patches
          001 (patch directory)
             pNNNNNN_RRRRRR.zip  (patch zip file)
          002 (optional)
          00N (optional, Nth patch directory)
          p6880880*.zip (optional, OPatch zip file)


    patches: The working directory for patch installation.
    001: The directory containing the patch zip file.
    00N: The second, third, … directory containing the second, third, … patch zip file. This is useful if you want to install multiple patches at once. The script will go into each of these directories in the numbered order and apply the patches.
    Important: It is up to the user to guarantee the patch order, if any.

    Below is a working example where p31771877 is the latest 19c Critical Patch Update at the time of writing (Oct 2020) and p6880880 is the latest version of OPatch.
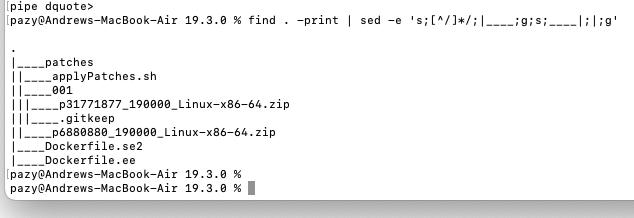
    With the patches in place, we can now run buildPatchedDockerImage.sh to create the “new” patched docker image

    ./buildPatchedDockerImage.sh -e -v 19.3.0 -p Oct2020
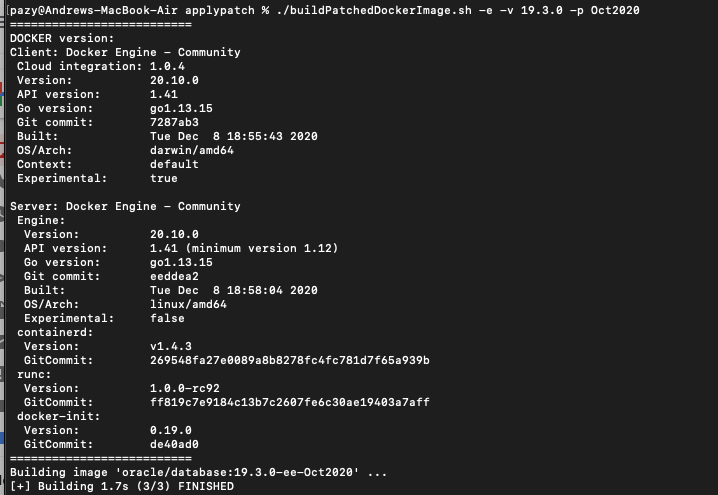
    
    Sorry about the change in screenshots, my Macbook changes theme based on time of day and I wrote this blog post over about 8hrs so initial screens where taken in the morning while above was taken at night when I got back to my laptop.

    It will take some time to patch the Oracle database with the patches as rebuild the docker image so go make yourself a coffee and come back in 25-30min. Once you return all going well you should be able to start your new patched docker image with the following command:

    docker run --name "oracle19.9" -p 1521:1521 -p 5500:5500 -e ORACLE_PDB=orapdb1 -e ORACLE_PWD=topsecretpass -e ORACLE_MEM=3000 -v /opt/oracle/oradata -d oracle/database:19.3.0-ee-Oct2020

    You can now login to your docker image using the below commands;

    docker exec -it oracle19.9 /bin/bash

    ps -ef |grep pmon

    . oraenv

    sqlplus / as sysdba

    If you have any questions about running Oracle Database in Docker, the process of doing or are having any problems please get in touch and I can help.

  • Oracle Database with Docker

    Running an Oracle database with Docker is a fairly simple task but I thought it would be useful to document the steps required for reference as I will likely need to refer to then in the future and to help others starting out on this path on how to run Oracle Database with Docker.

    Oracle Database with Docker

    Firstly Oracle only has 12c available via Docker Hub they had some legal grievances with each other a few years ago which means Oracle no longer updates the Docker Hub images but instead stores them here on GitHub. Another note is while the information on GitHub is great you still need to download the Oracle Database install .zip files from Oracle’s website yourself further if you plan on patching the Oracle database with docker you will need to have a valid Oracle Support licence and login to MOS.

    Firstly clone the Oracle Docker images to your local machine with git

    git clone https://github.com/oracle/docker-images.git

    After you have cloned the repo you will see there is a lot more available than just Oracle Database images but for this article its all we are concerned with, move to the OracleDatabase folder, then the SingleInstance folder and finally the 19.3.0 directory.

    cd ~/docker-images/OracleDatabase/SingleInstance/19.3.0

    With your downloaded Oracle Database install .zip copy in into your current 19.3.0 directory.

    cp $HOME/Downloads/LINUX.X64_193000_db_home.zip .

    If you plan on patching this Oracle Database with Docker in the future the default scripts remove some key directories within $ORACLE_HOME to reduce image size that will cause you to run into issues when trying to patch in the future, the fix is simple by default we choose to install the “SLIM” option we just need to update the Dockerfile within the 19.3.0 directory to read false.

    ARG SLIMMING=false

    Move back to the parent directory and run buildDockerImage.sh with a -v to specify database version in this case 19.3.0 and -e to indicate we want to use enterprise edition.

    cd ~/docker-images/OracleDatabase/SingleInstance

    ./buildDockerImage.sh -v 19.3.0 -e

    Depending on the resources you have on your machine will depend on how quickly the next part goes, I would say on average it will take 20-30min so go have coffee, you should come back to a Build Complete message. We have not successfully created an Oracle database image.

    To run the image use the following;

    docker run --name "oracle19.3" -p 1521:1521 -p 5500:5500 -e ORACLE_PDB=orapdb1 -e ORACLE_PWD=topsecretpass -e ORACLE_MEM=3000 -v /opt/oracle/oradata -d oracle/database:19.3.0-ee

    Where –name is the name of the docker image, ORACLE_PDB is the PDB name, ORACLE_PWD is the database password and ORACLE_MEM is the memory allocated to the DB. This first run of the docker image will go away and create the database so expect it to take some time during its first run.

    You can use sqldeveloper to connect to your PDB or connect to sqlplus via docker by logging directly into the docker image as per below

    docker exec -it oracle19.3 /bin/bash

    ps -ef |grep pmon

    . oraenv

    sqlplus / as sysdba

    Useful Docker commands

    Stop Docker Image

    docker container stop oracle19.3

    Start docker container

    docker container start oracle19.3

    Show running Docker containers

    docker ps

    List All Docker Images

    docker images

    Delete Docker Image

    docker image rm "image_id_here"

    And that’s all there is to it, it’s not a hard process and once you have been through it once or twice it becomes second nature. I’ve found great benefit running Oracle database with Docker, previously I had multiple Virtual machines with each database version on then now I just have Oracle database docker images that I can have running and access when I need them. If you enjoyed this article about Oracle database with Docker, please read my follow up on patching oracle database docker images here.

  • Check Node Manager Script

    Hi Again,

    I just knocked up this nodemanager check script that you can run as a cron job making sure the Weblogic Java NodeManager is running and if not email you. See below for the script.

    
    #!/bin/ksh
     #
     #########################################################
     # NAME:check_node_manager.sh #
     # AUTHOR: Paz #
     # DESC: Check no make sure Weblogic Node Manager is #
     # running #
     # DATE: 19/06/13 #
     # VERSION 1.0 #
     # CHANGE LOG: #
     # AP 19/06/2013 Creation #
     # #
     # #
     #########################################################
     #
     #set -x
    
    . $HOME/.profile
     export SCRIPT_HOME='add you scripts home'
     ####################CHECK NODE MANAGER JAVA PROCESS IS RUNNING########################
     cd $SCRIPT_HOME
    
    jps |grep -i NodeManager >Nodemgr_jps_status.log
    
    sleep 2
    
    nodemgr_jps_status=$(cat Nodemgr_jps_status.log |grep -i 'NodeManager' |wc -l)
    
    if [ ${nodemgr_jps_status} -gt 0 ]
     then
     echo 'do nothing Node Manager Alive'
     else
     mailx -s 'NODEMANAGER DOWN' [email protected]
     fi
    
    exit
    
    EOF


    The script can be changed if you use a script based nodemanager, if you change ‘jps’ for ‘ps -ef’ so the line would read:

    ps -ef |grep -i NodeManager >Nodemgr_jps_status.log

    Until next time

  • Adding Colour to Solaris 10

    I have spent hours trolling the net looking for a definitive guide on how to make colours (color if you are from the US) work in Solaris 10.

    By default colour isn’t enabled but once you know how it is relativity easy to get it to work.

    The first step is to download a number of new packages from www.sunfreeware.com the packages needed are as follows:

    coreutils-8.19-sol10-sparc-local
    gmp-4.2.1-sol10-sparc-local
    libiconv-1.14-sol10-sparc-local
    gcc-3.4.6-sol10-sparc-local
    libgcc-3.3-sol10-sparc-local
    libintl-3.4.0-sol10-sparc-local

    After all the packages are downloaded and added to your Solaris machine it time to install them using pkgadd.

    Get root on your machine and install the packages

    su

    pkgadd -d coreutils-8.19-sol10-sparc-local

    Do this for each of the downloaded packages.

    The next step is to test that colours are now working run the following command to check.

    /usr/local/bin/ls –color    (this command assumes that you have installed the packages in the default location)

    Now that colour is working we just need to modify the profile so that it always works.

    Depending on your shell you may need to edit .profile for ksh or .bashrc for bash.

    Update PATH by adding the new location to it:

    export PATH=$PATH:/usr/local/bin

    now if you run;

    which ls

    its should return /usr/local/bin/ls

    add an alias to your profile to append –color to ls command

    alias ls=’/usr/local/bin/ls –color’

    Reload your profile and type ls, the results should return in colour.

    The final section of this guide is to change the colour of your shell prompt you can do so by adding the folowing command to your profile

    export PS1=”\e[0;35m\u@\h > \e[m”

    You can set the colour to any of the below by editing the number;

    Color Code
    Black     0;30
    Blue       0;34
    Green    0;32
    Cyan      0;36
    Red        0;31
    Purple  0;35
    Brown  0;33
    Blue      0;34
    Green   0;32
    Cyan    0;36
    Red      0;31
    Purple 0;35
    Brown 0;33

    You should now have a fully coloured SHELL prompt.

  • DAC Restart Script

    Hi,

    Just thought I would share the script I wrote to restart your DAC server in the event of a crash, this can be helpful during the night as there is no need for a manual restart.

    I used a cron job to check to see if the process is running every 5min.

    
    #!/bin/ksh
    
    #########################################################
     # NAME:email_dac_restart.sh #
     # AUTHOR:  #
     # DESC: Makes sure dac is running and restarts if not #
     # VERSION: 18/1/13 #
     # CHANGE LOG: #
     #########################################################
    
    . ~/.profile
    
    if ps -ef | grep '/usr/jdk/instances/jdk1.6.0/bin/sparcv9/java -server -Xmn500m -Xms2048m -Xmx204'
     then
     echo 'do nothing'
     ## tail -1 $DAC_HOME/nohup.out | mailx -s 'DAC Running TST1 ' [email protected]
     else
     cd $DAC_HOME
     nohup $DAC_HOME/startserver.sh &
     tail -200 $DAC_HOME/nohup.out | mailx -s 'DAC Restarted  ' [email protected]
     fi
    
    exit
     EOF


    Any improvements or comments are welcome

  • OBIEE Performance Tuning Part 3

    For the final part of this guide we will take a look at some of the changes that can be made to the database to achieve better performance. The parameters I recommend changing are listed below;


    db_block_checksum – TRUE - database writer process will calculate a checksum
    
    db_file_multiblock_read_count – 0
    
    dml_locks - 1000 - minimize lock conversions and achieve better query / Read performance.
    
    job_queue_processes - 2 - This limits the total number of dbms_scheduler and dbms_job jobs that can be running at a given time. Thus, saving database resources
    
    log_buffer - 10485760 - larger values for log_buffer will reduce redo log file I/O.
    
    log_checkpoint_interval – 100000
    
    log_checkpoint_timeout – 3600
    Open_cursors - 1000
    undo_retention - 90000
    Database resource plan – Internal/off


    Implementing these changes reduced my report timings further showing a clear increase in performance.

    Results:
    Time after changing instanceconfig.xml against Database changes
    1. 1m44s      43s
    2. 2m56s      1m34s
    3. 5m15s      3m19s
    4. 2m42s      1m5s

    This concludes my 3 step guide for OBIEE performance tuning, In future I might write a piece on tuning reports for performance, as the above results we are still above the 1min mark in some reports making sure you write efficient SQL queries by using indexes, partioning and materialized views during development will ensure you are able to reduce these times further.

    Until next time.

  • OBIEE Presentation Service

    I’ve known about this issue for some time now if using an older version of OBIEE then you may have trouble starting all of the opmn services in one go be it from the front or back-end.

    From the back-end if you run opmnctl startall the presentation service fails to come Alive.

    The reason for this is it is timing out before it can be brought up be it because you may have a large .rpd file.

    This is a know issue with OBIEE and the only work around is to bring the Presentation service online by itself by running;

    
    opmnctl startproc ias-component=coreapplication_obips1


    you can try and edit opmn.xml to increase the time-out but Oracle notes that little success has been achieved by doing this and the only true fix is to upgrade OBIEE

  • Socket communication error

    I have came across a socket communication error. This error is very general and can be caused by a number of issues.

    In my case it related to a port conflict on the OBIEE server.

    The first thing I would suggest to try would be stopping all OBIEE and MW services then using ps -ef | grep to kill any outstanding processes. Hopefully all goes well for you and upon restarting all services everything comes back up and all is well.

    If you are still faced with issues I would try changing the port range that OBIEE uses this can be done through MW Enterprise Manager.

    Head to BI > Core Application > Capacity Management > Scalability

    Unlock & Edit settings and shorten the port range OBIEE is using, Apply the change and restart OPMN services.