Blog

  • 1 Month Growth on Self-Hosted WordPress

    Analysis of being on self-hosted WordPress

    22nd of February marked one month that this blog has been on self-hosted WordPress. I never really believed sites that said if you want more traffic or to rank higher on Google you need to get off wordpress.com and start self-hosting.

    After one month I can tell you its true, over this last month my daily visitor count has doubled from 10-12 readers daily to 25-30 readers coming along to read my blog which I still find quite strange as to why anyone wants to read my stuff but hey maybe it means I am improving.

    When I publish a new article my readership shoots up considerably to well over 100 readers and trails down as the post begins to age.

    My monthly page views have doubled from around 300-400 to over just over 1000.

    self-hosted WordPress
    Before move to self-hosting
    self-hosted WordPress
    After move to self-hosting

    Part of the reason I believe for this growth is the excellent plugins that become available to you once you start a self-hosted WordPress site. SEO plugins allow me to ensure my posts meet baseline SEO standards helping me rank higher on Google and in-turn have more clicks and growth and just, in general, keeping me on the right track.

    I’ve also ramped up the posting a little and started trying to post twice per week rather than just once which can account for the increased baseline of traffic as it never gets an opportunity to slump all the way down to the lower levels.

    Next Challenges

    Further growth on this small-time self-hosted WordPress site is something I would like to see but my own knowledge of what I can do to grow is running dry this is purely a hobby so I can’t really dedicate enough time to be always posting and on top of that one of the biggest challenges I face is coming up with blog post ideas I’ve deliberately left the doors open to post about everything and anything but still I find it a struggle to come up with post ideas.

    All of the “how to be a blogger” sites now dictate that I should be reaching out to others in my niche for guest posts and trying to grow a following via a social media or email list to attract a consistent following/readership but I find this area extremely difficult as I don’t really know a lot or where to find other bloggers (fancy a guest post allmyfriends… or steve.in?).

    More Thoughts

    SEO on a self-hosted WordPress site is a dark art, is paying for a profession worth it? I am a pretty small blog I know this, I rank reasonably well on some keywords but if I pay a professional SEO expert ranking higher will get me more traffic and therefore increase readership but the big question I am debating is whether it’s worth it.

    A short post this week I am still managing to post every week on a Saturday and slowly introducing a Tuesday post as well, so far I’ve kept this up during its initial weeks but its been more of an information type dump than any long-form post so far, I’ll consider a Tuesday post as optional at the moment and see where my growth goes over the next few months. Until next time now am off to the bank as Google is making me rich!

    Self-Hosted WordPress
    Drinks are on me
  • Transform CentOS to Oracle Linux 7 in 2 Easy Steps

    I’ve been meaning to write an article on how to switch from CentOS to Oracle Linux for a while since Red Hat owned by IBM announced its new direction for CentOS, I’ve found myself with a bit of spare time over the weekend so finally got around to documenting the steps required to migrate from CentOS to Oracle Linux.

    What is CentOS?

    CentOS (Community Enterprise Operating System) was a Linux distribution that provided a free, community-supported computing platform functionally compatible with its upstream source,
    Red Hat Enterprise Linux in January 2014, CentOS announced the official joining with Red Hat while staying independent from RHEL under a new CentOS governing board. The first CentOS release in May 2004, numbered CentOS version 2, was forked from RHEL version 2.1AS with the most recent version being CentOS 8 released on 24 September 2019.

    Why Switch?

    In December last year, Red Hat announced that CentOS that the availability of CentOS undermines the commercial side of its business with CentOS becoming CentOS Stream, which is is a development preview of what is soon to come in Red Hat Enterprise Linux, focused on the next minor release. Fedora another distribution maintained by Red Hat is further ahead and more experimental than what CentOS will become.

    In the past, CentOS has been a community build of the current RHEL source, providing a robust production distro for those willing to do without Red Hat support. When RHEL gets a fix, the project aims to have the same fix available for CentOS “within 72 hours” of its release, while new point releases of CentOS come “four to eight weeks after the release by upstream.” In other words, CentOS tracked RHEL. But with this new update, the direction changes making CentOS a more experimental OS rather than the stable distro capable of production workloads.

    Oracle Linux

    Not Oracle you say why move away from one corporate overload (IBM owns Red Hat) and jump in the pan with another (Oracle)?

    CentOS to Oracle Linux
    Oracle Linux Penguin

    Oracle Linux much like what CentOS does tracks the RHEL base release and bar Oracles Unbreakable Kernal is pretty much a direct clone of Red Hat with some Oracle branding slapped over the Red Hat stuff. Oracle previously posted about it here and to alleviate some concerns provides an FAQ.

    Switching from CentOS to Oracle Linux

    Switching from CentOS to Oracle Linux couldn’t be easier, Oracle provides a lovely shell script to do all the hard work for you, you can get it from their GitHub. Let’s demo the process below. I’ve used a CentOS 7 Vagrant host to perform the process which you can manually download yourself here or if you are already using Vargant just follow the steps below. I’ve written about Vagrant before if you are interested.

    Lets get the vagrant CentOS 7 vagrant file and start the machine;

    vagrant init centos/7
    vagrant up
    

    With CentOS 7 installed lets install git and ensure all the packages are up-to-date;

    [vagrant@localhost ~]$ cat /etc/redhat-release
    CentOS Linux release 7.9.2009 (Core)
    
    sudo yum install git
    sudo yum update && sudo yum upgrade -yum

    Lets get Oracle’s script to swap the OS from CentOS to Oracle Linux

    git clone https://github.com/oracle/centos2ol.git
    

    Lets run the centos2ol.sh script;

    [root@localhost centos2ol]# ls
    centos2ol.sh  CONTRIBUTING.md  LICENSE.txt  README.md  SECURITY.md
    [root@localhost centos2ol]# ./centos2ol.sh


    It doesnt take long at all to do the changes, my example took about 5 mintues to run. Below I have posted an extract of the logs

    [root@localhost centos2ol]# ./centos2ol.sh
    Checking for required packages...
    Checking your distribution...
    package epel-release is not installed
    Checking for yum lock...
    Checking for required python packages...
    Finding your repository directory...
    Learning which repositories are enabled...
    Repositories enabled before update include:
    base
    extras
    updates
    Downloading Oracle Linux yum repository file...
      % Total    % Received % Xferd  Average Speed   Time    Time     Time  Current
                                     Dload  Upload   Total   Spent    Left  Speed
    100 16402  100 16402    0     0  55698      0 --:--:-- --:--:-- --:--:-- 55789
    Looking for yumdownloader...
    Backing up and removing old repository files...
    Removing CentOS-specific yum configuration from /etc/yum.conf
    Downloading Oracle Linux release package...
    Loaded plugins: fastestmirror
    Loading mirror speeds from cached hostfile
    
    ...
    ...
    ...
    
    done
    Removing yum cache
    Switch complete. Oracle recommends rebooting this system.
    

    After a reboot of the host we see we have successfully moved from CentOS to Oracle Linux

    [vagrant@localhost ~]$ uptime
     12:31:05 up 0 min,  1 user,  load average: 1.17, 0.42, 0.15
    [vagrant@localhost ~]$ cat /etc/redhat-release
    Red Hat Enterprise Linux Server release 7.9 (Maipo)
    [vagrant@localhost ~]$ cat /etc/oracle-release
    Oracle Linux Server release 7.9
    

    Other Options

    Another option is to wait on Rocky Linux, after the news broke Gregory Kurtzer, the founder of the CentOS project who had been out of the scene for a few years would return and create Rocky Linux with the goal of building a community enterprise operating system designed to be 100 percent bug-for-bug compatible with Red Hat Enterprise Linux. This is great news but it’s likely to be a year or two away at the earliest, you can help out with Rocky Linux and track updates on their website here.

    Cloud Linux OS made a similar announcement as well that it would also work on making a CentOS/Red Hat clone called AlmaLinux. Both Rocky Linux and AlmaLinux are still developing their respective operating systems but Alma already has a working Beta which you can check out here.

    Conclusions

    Whether you like Oracle or not they have provided a viable way to move from CentOS to Oracle Linux as Red Hat starts to utilize CentOS for experimental features do you really want production hosts running on such a distro?

  • Show Your Work

    Summary of Show Your Work

    Show Your Work is a great little book, pretty short you can easily get through it in a couple of hours. It’s about Showing Your Work and how it doesn’t matter what other people think if you are enjoying it go for it. It speaks about how becoming good or an expert in an area is not an overnight process and the process of becoming is where the real achievement lies rather than at the end once the goal is achieved. One of the big concepts is around just doing it, it makes you wonder how many people refrain from doing something they want to do through the fear of other’s opinions or that they won’t be good at it.

    Show Your Work
    Show Your Work by Austin Kleon

    It gives another example where a teacher splits a class of 30 photography students into two and tells them there will be the best photo competition, the first group to research everything they can on photography and related concepts but must take and submit just one picture. The other group must do no research but take at least one picture every day and submit their best, can you guess which group produced the best results?

    My Takeaways from Show Your Work

    I really liked the book, it’s kind of the basis of why I started blogging plus Atomic Habits, I cast a wide net with some of the topics I cover here but through posting weekly I should slowly improve and if it comes down to it who would you condier a better blogger/writter someone with a minorly succesful blog or someone that has all the credentails but has never published?

    Favorite Quotes

    “Make stuff you love and talk about stuff you love and you’ll attract people who love that kind of stuff. It’s that simple.”
    ― Austin Kleon

    “The worst troll is the one that lives in your head.”
    ― Austin Kleon

    “The real gap is between doing nothing and doing something.”
    ― Austin Kleon

    “It sounds a little extreme, but in this day and age, if your work isn’t online, it doesn’t exist.”
    ― Austin Kleon

    Closing Words

    Austin Kleon does a few other books on my reading list, I am looking forward to Steal like an Artist.

    Show Your Work is a great book I would encourage everyone to read it, it’s quite inspiring. It really makes you think about how people are more interested in the process more than the final product, while yea the final product can be great seeing it come to fruition as time goes on is even better like you are a passenger along for the ride.

    If you enjoied this article please check out some of my others here.

  • Vagrant Cheat Sheet

    Some useful commands I have collected to act as a Vagrant cheat sheet for using Vagrant. More for my own reference than anything else but sharing and posting on my blog is always good for each future reference. Expect this Vagrant cheat sheet article to be updated over time as I add more to it to become an all-inclusive vagrant cheat sheet.

    Creating a VM

    • vagrant init — Initialize Vagrant with a Vagrantfile and ./.vagrant directory, using no specified base image. Before you can do vagrant up, you’ll need to specify a base image in the Vagrantfile.
    • vagrant init <boxpath> — Initialize Vagrant with a specific box. To find a box, go to the public Vagrant box catalog. When you find one you like, just replace its name with box path. For example, vagrant init ubuntu/trusty64.

    Starting a VM

    • vagrant up — starts vagrant environment (also provisions only on the FIRST vagrant up)
    • vagrant resume — resume a suspended machine (vagrant up works just fine for this as well)
    • vagrant provision — forces reprovisioning of the vagrant machine
    • vagrant reload — restarts the Vagrant machine, loads new Vagrantfile configuration
    • vagrant reload --provision — restart the virtual machine and force provisioning

    Getting into a VM

    • vagrant ssh — connects to the machine via SSH
    • vagrant ssh <boxname> — If you give your box a name in your Vagrantfile, you can ssh into it with box name. Works from any directory.

    Stopping a VM

    • vagrant halt — stops the vagrant machine
    • vagrant suspend — suspends a virtual machine (remembers state)

    Cleaning Up a VM

    • vagrant destroy — stops and deletes all traces of the vagrant machine
    • vagrant destroy -f — same as above, without confirmation

    Boxes

    • vagrant box list — see a list of all installed boxes on your computer
    • vagrant box add <name> <url> — download a box image to your computer
    • vagrant box outdated — check for updates vagrant box update
    • vagrant boxes remove <name> — deletes a box from the machine
    • vagrant package — packages a running VirtualBox env in a reusable box

    Saving Progress

    vagrant snapshot save [options] [vm-name] <name> — vm-name is often default. Allows us to save so that we can rollback at a later time

    Tips

    • vagrant -v — get the vagrant version
    • vagrant status — outputs status of the vagrant machine
    • vagrant global-status — outputs status of all vagrant machines
    • vagrant global-status --prune — same as above, but prunes invalid entries
    • vagrant provision --debug — use the debug flag to increase the verbosity of the output
    • vagrant push — yes, vagrant can be configured to deploy code!
    • vagrant up --provision | tee provision.log — Runs vagrant up, forces provisioning and logs all output to a file

    If you know of any useful comands to add to this vagrant cheat sheet leave a comment and ill get them added.

  • Puppet Master with Vagrant to Pull your DevOps Strings

    What is Vagrant?

    Puppet Master with Vagrant, but what is Vagrant? Vagrant is an open-source software product by HashiCorp for building and maintaining portable virtual software development environments; e.g., for VirtualBox, KVM, Hyper-V, Docker containers, VMware, and AWS. It tries to simplify the software configuration management of virtualizations in order to increase development productivity.

    Vagrant really comes into its own when you need something more than a Docker image. In simplistic terms, it provides you with a nice packaged “Vagrant” file to install a “Vagrant VM”. It’s great because it’s repeatable and you can ensure if you are using it as part of a lab or test suite that each Virtual Machine is identical.

    Puppet Master with Vagrant

    I’ve been using Vagrant with Oracle Databases and Ansible for years it’s quick and easy and saves me the hassle of going through the oracle install process each time I want a database, with Vagrant I can simply navigate to the location of my Vagrant File and type “vagrant up”.

    Puppet Master
    I am the Pupper Master

    In my work, I have had started to focus more on Puppet so I embarked on a quest to create a Puppet Master vagrant file at home so I can spin up my own puppet master within a virtual machine to help with my own learning. I found this great GitHub repository that had already done much of the work but it hadn’t been touched or updated for years so I forked the code (here) and started my own journey.

    I have successfully upgraded the base OS to Ubuntu 20.04 (LTS) and upgraded to Puppet 7. I am still not all the way there yet having some issue with a dashboard module that I am trying to get my head around if anyone fancied helping with all the code on GitHub feel free to pull it down and have a look for yourself.

    Using Vagrant

    Install the vagrant application from the Vagrant site you also need to ensure you have Virtual Box or VMware installed. I use Virtual Box myself as it’s just what I am most familiar with but the steps involved are the same regardless.

    Use Git to clone the vagrant files to you own machine;

    git clone https://github.com/pazyp/vagrant-puppetmaster.git
    

    This should be pretty fast, navigate to the downloaded code and start the vagrant host;

    cd vagrant-puppetmaster
    vagrant up
    

    Running vagrant up will star the process of building the Virtual Machine and installing Puppet the whole process takes about 15min to be left with a usable Puppet Master.

    Useful Vagrant Commands

    A list of commands for reference that can help you out using Vagrant

    Creating a VM

    • vagrant init — Initialize Vagrant with a Vagrantfile and ./.vagrant directory, using no specified base image. Before you can do vagrant up, you’ll need to specify a base image in the Vagrantfile.
    • vagrant init <boxpath> — Initialize Vagrant with a specific box. To find a box, go to the public Vagrant box catalog. When you find one you like, just replace its name with box path. For example, vagrant init ubuntu/trusty64.

    Starting a VM

    • vagrant up — starts vagrant environment (also provisions only on the FIRST vagrant up)
    • vagrant resume — resume a suspended machine (vagrant up works just fine for this as well)
    • vagrant provision — forces reprovisioning of the vagrant machine
    • vagrant reload — restarts the Vagrant machine, loads new Vagrantfile configuration
    • vagrant reload --provision — restart the virtual machine and force provisioning

    Getting into a VM

    • vagrant ssh — connects to the machine via SSH
    • vagrant ssh <boxname> — If you give your box a name in your Vagrantfile, you can ssh into it with box name. Works from any directory.

    Stopping a VM

    • vagrant halt — stops the vagrant machine
    • vagrant suspend — suspends a virtual machine (remembers state)

    Cleaning Up a VM

    • vagrant destroy — stops and deletes all traces of the vagrant machine
    • vagrant destroy -f — same as above, without confirmation

    Boxes

    • vagrant box list — see a list of all installed boxes on your computer
    • vagrant box add <name> <url> — download a box image to your computer
    • vagrant box outdated — check for updates vagrant box update
    • vagrant boxes remove <name> — deletes a box from the machine
    • vagrant package — packages a running VirtualBox env in a reusable box

    Saving Progress

    vagrant snapshot save [options] [vm-name] <name> — vm-name is often default. Allows us to save so that we can rollback at a later time

    Tips

    • vagrant -v — get the vagrant version
    • vagrant status — outputs status of the vagrant machine
    • vagrant global-status — outputs status of all vagrant machines
    • vagrant global-status --prune — same as above, but prunes invalid entries
    • vagrant provision --debug — use the debug flag to increase the verbosity of the output
    • vagrant push — yes, vagrant can be configured to deploy code!
    • vagrant up --provision | tee provision.log — Runs vagrant up, forces provisioning and logs all output to a file

    Conclusions

    As I said at the start of the article Vagrant is great when you need something more traditional that a docker image and since its a Virtual Machine with a little work, time and patience you should be able to replicate any production environment to have a reusable testing host to increase your DevOps productivity.

  • How to use Oracle Database Docker Image to Supercharge your DevOps Learning

    What is Docker?

    Docker is a set of platform as a service (PaaS) products that use OS-level virtualization to deliver software in packages called containers. Containers are isolated from one another and bundle their own software, libraries and configuration files; they can communicate with each other through well-defined channels. Because all of the containers share the services of a single operating system kernel, they use fewer resources than virtual machines.

    Oracle Database Docker Image

    I previously wrote these two blog posts (here and here) about installing Oracle Database Docker Image as well as patching an Oracle Database Docker Image. Today a slight cop-out of an article but I am combining both posts into an all in a one-stop-shop for creating and patching an Oracle Database Docker Image.

    Note – You will need to have a My Oracle Support login and valid support agreement to download Oracle Database patches if you don’t have one of these your not going to get very far. Further, if you have chosen to use a “slim” Oracle database docker image you will likely run into problems, during the “sliming” down process folders are removed from the docker image that means when it comes to patching opatch will throw an error since some folders and directories don’t exist.

    Useful Docker Commands

    ## Stop Docker Image
    docker container stop oracle19.3
    
    ##S tart docker container
    docker container start oracle19.3
    
    ## Show running Docker containers
    docker ps
    
    ## List All Docker Images
    docker images
    
    ## Delete Docker Image
    docker image rm "image_id_here"
    

    Oracle Database Docker Image

    Firstly Oracle only has 12c available via Docker Hub they had some legal grievances with each other a few years ago which means Oracle no longer updates the Docker Hub images but instead stores them here on GitHub. Another note is while the information on GitHub is great you still need to download the Oracle Database install .zip files from Oracle’s website yourself further if you plan on patching the Oracle database with docker you will need to have a valid Oracle Support licence and login to MOS.

    Firstly clone the Oracle Docker images to your local machine with git.

    git clone https://github.com/oracle/docker-images.git
    

    After you have cloned the repo you will see there is a lot more available than just Oracle Database images but for this article its all we are concerned with, move to the OracleDatabase folder, then the SingleInstance folder and finally the 19.3.0 directory.

    cd ~/docker-images/OracleDatabase/SingleInstance/19.3.0
    

    With your downloaded Oracle Database install .zip copy in into your current 19.3.0 directory.

    cp $HOME/Downloads/LINUX.X64_193000_db_home.zip .
    

    If you plan on patching this Oracle Database with Docker in the future the default scripts remove some key directories within $ORACLE_HOME to reduce image size that will cause you to run into issues when trying to patch in the future, the fix is simple by default we choose to install the “SLIM” option we just need to update the Dockerfile within the 19.3.0 directory to read false.

    ARG SLIMMING=false
    

    Move back to the parent directory and run buildDockerImage.sh with a -v to specify database version in this case 19.3.0 and -e to indicate we want to use enterprise edition.

    cd ~/docker-images/OracleDatabase/SingleInstance
    ./buildDockerImage.sh -v 19.3.0 -e
    

    Depending on the resources you have on your machine will depend on how quickly the next part goes, I would say on average it will take 20-30min so go have coffee, you should come back to a Build Complete message. We have not successfully created an Oracle database image.

    To run the image use the following;

    docker run --name "oracle19.3" -p 1521:1521 -p 5500:5500 -e ORACLE_PDB=orapdb1 -e ORACLE_PWD=topsecretpass -e ORACLE_MEM=3000 -v /opt/oracle/oradata -d oracle/database:19.3.0-ee
    

    Where –name is the name of the docker image, ORACLE_PDB is the PDB name, ORACLE_PWD is the database password and ORACLE_MEM is the memory allocated to the DB. This first run of the docker image will go away and create the database so expect it to take some time during its first run.

    You can use sqldeveloper to connect to your PDB or connect to sqlplus via docker by logging directly into the docker image as per below;

    docker exec -it oracle19.3 /bin/bash
    ps -ef |grep pmon
    . oraenv
    sqlplus / as sysdba
    

    Patching Oracle Database Docker Image

    Running an Oracle 19c database in docker you are not able to patch the database in a traditional sense, you cannot hop into the container and patch it with opatch you need to create a “patched” image, thankfully Oracle on their GitHub (here) provide some shell scripts to make this task easier.

    Clone the Oracle Docker images to your local machine with git (if you don’t already have them)

    git clone https://github.com/oracle/docker-images.git
    

    In this example, we will be patching a single instance 19c database. Head down into the SingleInstance folder then samples and applypatch.

    cd ~/docker-images/OracleDatabase/SingleInstance/19.3.0/samples/applypatch
    

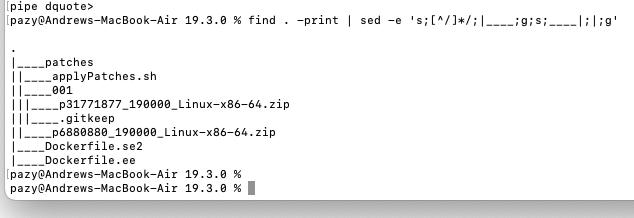
    The scripts used in this example rely on the following directory structure:

    19.3.0.0
       patches
          001 (patch directory)
             pNNNNNN_RRRRRR.zip  (patch zip file)
          002 (optional)
          00N (optional, Nth patch directory)
          p6880880*.zip (optional, OPatch zip file)
    

    patches: The working directory for patch installation.
    001: The directory containing the patch zip file.
    00N: The second, third, … directory containing the second, third, … patch zip file. This is useful if you want to install multiple patches at once. The script will go into each of these directories in the numbered order and apply the patches.
    Important: It is up to the user to guarantee the patch order, if any.

    Below is a working example where p31771877 is the latest 19c Critical Patch Update at the time of writing (Oct 2020) and p6880880 is the latest version of OPatch.

    With the patches in place, we can now run buildPatchedDockerImage.sh to create the “new” patched docker image

    ./buildPatchedDockerImage.sh -e -v 19.3.0 -p Oct2020
    

    It will take some time to patch the Oracle database with the patches as rebuild the docker image so go make yourself a coffee and come back in 25-30min. Once you return all going well you should be able to start your new patched docker image with the following command:

    docker run --name "oracle19.9" -p 1521:1521 -p 5500:5500 -e ORACLE_PDB=orapdb1 -e ORACLE_PWD=topsecretpass -e ORACLE_MEM=3000 -v /opt/oracle/oradata -d oracle/database:19.3.0-ee-Oct2020
    

    You can now login to your patched Oracle Database docker image using the below commands;

    docker exec -it oracle19.9 /bin/bash
    ps -ef | grep pmon
    . oraenv
    sqlplus / as sysdba
    

    Conclusions

    I’ve been using Oracle Database Docker Images for a little while now, they are very convenient for quick development or if you need to check out a certain database parameter.

    If you have any questions about running Oracle Database in Docker or the Oracle Database Docker Image, the process of creating or patching an image and having problems please get in touch and I can help.

  • Tools of Titans Most Gifted Books

    I just finished reading Tools of Titans by Tim Ferris for some reason I thought the book was a brand new release, not sure where I got that idea when I found out it was published in 2016. The book is a collection of interviews of people that have featured on the Tim Ferris Show. I enjoyed the book I listened to Tools of Titans to it through Audible.

    Tools of Titans

    It’s a difficult one to write an article reviewing as each chapter is a different person with only 3 overarching themes of Healthy, Wealthy and Wise.

    Part of the book Tim asks the guests what is your most recommended or most gifted book so I figured why not collect the recommendations up and post them here. I am always on the hunt for new book suggestions and those in Tools of Titans seem as good as any.

    Tools of Titans Recommended

    The below list notes the most recommended books listed in Tools of Titans. I have left off who has recommended them so if you want that extra level of infomation I would suggest picking up the book.

    Tao Te Ching by Lao Tzu (5 mentions)

    Atlas Shrugged by Ayn Rand (4)

    Sapiens by Yuval Noah Harari (4)

    Siddhartha by Hermann Hesse (4)

    The 4-Hour Workweek by Tim Ferriss (4)

    The Checklist Manifesto by Atul Gawande (4)

    Dune by Frank Herbert (3)

    Influence by Robert Cialdini (3)

    Stumbling on Happiness by Daniel Gilbert (3)

    Superintelligence by Nick Bostrom (3

    Surely You’re Joking, Mr. Feynman! by Richard P. Feynman (3)

    The 4-Hour Body by Tim Ferriss (3)

    The Bible (3)

    The Hard Thing About Hard Things by Ben Horowitz (3)

    The War of Art by Steven Pressfield (3)

    Watchmen by Alan Moore (3)

    Zero to One by Peter Thiel with Blake Masters (3)

    Conclusions

    Overall I enjoyed the book and I would recommend it to others, chapters are short enough to drag on and with the variety of people interviewed it makes of nice reading as every new chapter is almost like starting from the beginning with a different perspective. I listened to the book in audiobook format, I do think a hard copy would be a good purchase to use for reference and inspiration, jumping to a chapter or a specific person as you please rather than reading/listening to it cover to cover as I did.

    Interestingly or maybe not I have already checked off The 4-Hour Work Week, Dune, The Bible and Watchmen over the years.

    If you enjoyed this article I would appreciate it if you had a look at some of my others here.

  • Migrating from WordPress.com to WordPress.org

    Migrating from WordPress.com to WordPress.org the time has come!

    Why I am migrating from WordPress.com to WordPress.org?

    I’ve had this blog since 2013 and blogged on and off very sporadically over that time. I’ve had months where I blogged a lot only to burn out and months and months when I haven’t blogged at all. November last year I set myself the small goal of blogging once per week and to publish the post every Saturday.

    I started on WordPress.com it was fine all I wanted to do was write posts and had little desire to do much else. As I started to get more readers I needed more, I started to notice shortcomings on the wordpress.com platform, for example, I had an idea where I would like to create a monthly newsletter for email subscribers but to hook my blog into my CRM service of choice would mean I needed to upgrade to a business plan, there is no chance I was paying $300 per year for a personal blog site that is a hobby more than anything. So I embarked on the task of migrating from WordPress.com to WordPress.org.

    Migrating from WordPress.com to WordPress.org
    Migrating from WordPress.com to WordPress.org

    Don’t get me wrong wordpress.com is good. If you want to write posts go buy a domain, pick a theme and away you go but as soon as you desire more control or analytics than Automatic’s Jetpack tool can offer then wordpress.com is not the place you want to be unless you have deep pockets.

    On the flip side, wordpress.org offers the WordPress software with the caveat that you must self-host, there are tons of self-hosting providers out there, research some, pick what fits your needs and in an hour or two you will have a WordPress site, this is where the similarities with wordpress.com end, while yes the interface looks the same now being self-hosted you are on the hook for every aspect of your site, things you may not have considered are site security, site performance, backups and maintenance of these areas are covered for you with wordpress.com but on utilising wordpress.org the responsibility lies with you with little hand-holding along the way.

    I actually enjoy this extra control I work in technology so I am not particularly phased by the more technical side involved of being self-hosted requires but I can see how it would put others off. It gives me the feeling that my blog is now mine and I am no longer utilizing someone else’s platform, it’s only been one week but already I have seen extra growth and viewership from moving to a self-hosted blog. The extra granularity, SEO capabilities and analytics available can only help me grow further.

    I actually enjoy this extra control I work in technology so I am not particularly phased by the more technical side involved of being self-hosted requires but I can see how it would put others off. It gives me the feeling that my blog is now mine and I am no longer utilizing someone else’s platform, it’s only been one week but already I have seen extra growth and viewership from moving to a self-hosted blog. The extra granularity, SEO capabilities and analytics available can only help me grow further.

    I have some ideas on what I would like to add to my blog primarily a newsletter albeit I haven’t really decided on the frequency that I want to send it (once per year?).

    Addons used after Migrating from WordPress.com to WordPress.org

    If you are reading this post and thinking of moving to a self-hosted plan here’s a no-nonsense list of the addons I am using, none of these are affiliate links its a list of the addons I am using at the time of writing.

    Migrating from WordPress.com to WordPress.org
    Migrating from WordPress.com to WordPress.org

    Akismet Anti-Spam
    Anti Spam addon by Automatic
    Antispam BeeAnother Anti Spam, I’ll drop one soon
    iThemes SecurityTake the guess-work out of securing your site
    JetpackCreated by Automatic, might drop it once I get used to SiteKit
    Site KitOne stop shop for everything Google
    WP Fastest CacheSite cache, I also use Cloudflare for CDN
    UpdraftPlusSite backups
    Rank Math SEOOffers more features for free than Yeoast SEO
    Pluggins

    When planning to for the task of migrating from WordPress.com to WordPress.org I opted to use OVH as my self-hosting provider, I’ve used them for a number for years for a small VPS and never had any issue so I figured why not stick with a provider that I know provide a reliable service.

    If you have got this far through this post on migrating from WordPress.com to WordPress.org you might be wondering why there are so many links, table of contents, tables, images etc.

    This post is an SEO learning experience to get the highest SEO score I can with Rank Math SEO and all these additions are gold for SEO and ranking on search engines. Thanks for reading my post on migrating from WordPress.com to WordPress.org. If you decider to migrating from WordPress.com to WordPress.org yourself give me a shout and let me know how it goes.

  • Patching Oracle Database on Docker

    I wrote this post which details creating an Oracle 19c Database docker image.

    Following on from this post I will detail the steps required to patch and Oracle 19c Docker image. With most of my technology-related posts, they are written because I will require this information in the future so a blog post provides reference for my future self.

    Running an Oracle 19c database in docker you are not able to patch the database in a traditional sense, you cannot hop into the container and patch it with opatch you need to create a “patched” image, thankfully Oracle on their GitHub (here) provide some shell scripts to make this task easier.

    Note – You will need to have a My Oracle Support login and valid support agreement to download Oracle Database patches if you don’t have one of these your not going to get very far. Further, if you have chosen to use a “slim” Oracle database docker image you will likely run into problems, during the “sliming” down process folders are removed from the docker image that means when it comes to patching opatch will throw an error since some folders and directories don’t exist.

    Clone the Oracle Docker images to your local machine with git (if you don’t already have them)

    git clone https://github.com/oracle/docker-images.git

    In this example, we will be patching a single instance 19c database. Head down into the SingleInstance folder then samples and applypatch.

    cd ~/docker-images/OracleDatabase/SingleInstance/19.3.0/samples/applypatch

    The scripts used in this example rely on the following directory structure:

    19.3.0.0
       patches
          001 (patch directory)
             pNNNNNN_RRRRRR.zip  (patch zip file)
          002 (optional)
          00N (optional, Nth patch directory)
          p6880880*.zip (optional, OPatch zip file)


    patches: The working directory for patch installation.
    001: The directory containing the patch zip file.
    00N: The second, third, … directory containing the second, third, … patch zip file. This is useful if you want to install multiple patches at once. The script will go into each of these directories in the numbered order and apply the patches.
    Important: It is up to the user to guarantee the patch order, if any.

    Below is a working example where p31771877 is the latest 19c Critical Patch Update at the time of writing (Oct 2020) and p6880880 is the latest version of OPatch.

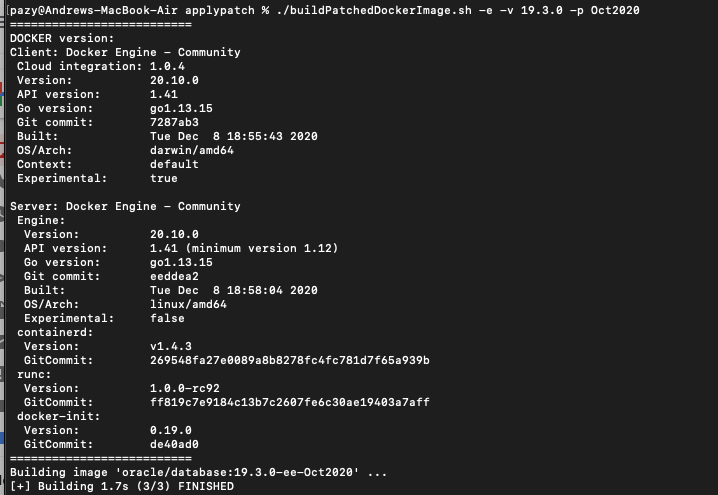
    With the patches in place, we can now run buildPatchedDockerImage.sh to create the “new” patched docker image

    ./buildPatchedDockerImage.sh -e -v 19.3.0 -p Oct2020
    
    Sorry about the change in screenshots, my Macbook changes theme based on time of day and I wrote this blog post over about 8hrs so initial screens where taken in the morning while above was taken at night when I got back to my laptop.

    It will take some time to patch the Oracle database with the patches as rebuild the docker image so go make yourself a coffee and come back in 25-30min. Once you return all going well you should be able to start your new patched docker image with the following command:

    docker run --name "oracle19.9" -p 1521:1521 -p 5500:5500 -e ORACLE_PDB=orapdb1 -e ORACLE_PWD=topsecretpass -e ORACLE_MEM=3000 -v /opt/oracle/oradata -d oracle/database:19.3.0-ee-Oct2020

    You can now login to your docker image using the below commands;

    docker exec -it oracle19.9 /bin/bash

    ps -ef |grep pmon

    . oraenv

    sqlplus / as sysdba

    If you have any questions about running Oracle Database in Docker, the process of doing or are having any problems please get in touch and I can help.